Reduce your food waste. It has become a sustainability mantra. There are plenty of great meal planning and food storage tips, but in my experience, the best way to divert your food waste from landfill is composting. Before I got started the idea of composting at home felt intimidating. What if I did it wrong? Would I find the time? What about smells, rodents, and just the general yuck of rubbish? I have had my compost bin for a few years, and I would call myself an experienced beginner at composting. Experienced because I know how to work with a compost bin. Beginner because I have yet to experiment with other methods. Composting has taught me to work with nature, see waste as a resource, and has drastically reduced the amount of rubbish we take to the kerbside every week.
So, if you are interested, here is my beginner’s guide to compost bins!
Did My Composting Fears Come True?
Before delving into my composting past, I want to tell you what came of the fears I had before getting started:
- What if I did it wrong? All my mistakes so far were easy to fix. Solutions were just a Google search away. There have been no composting disasters. If you want to know about mistakes I made as a beginner, I have written about 5 mistakes (and 5 top tips!).
- Would I have the time? I spend maybe 15 minutes a week tending to my compost bin.
- What about smells, rodents, and just the general yuck of rubbish? You will only get a smell when your composting ingredients are out of balance and the earthy, pleasant smell will return when you have made your adjustments. My dog, whose mission in life is chasing small animals and birds, never even sniffs my compost bin (which has a rodent proof base). Rather than yuck, my compost reminds me of the smell and feel of a humid forest. A compost bin in no way resembles a regular rubbish bin.
My Composting Experience So Far
In my student days, when I lived in an apartment, I picked up a little kitchen caddy at my local community garden. In this, I would collect my food scraps and made the weekly trip to empty the contents. The community garden worked with large compost bays and many bins, and produced beautiful compost. If any was available, I got to take some home for the plants on my balcony. This option is likely available to you if you live in an apartment. You can also download Peels, an app that will connect you to people and places that will take your food scraps for composting in your area.
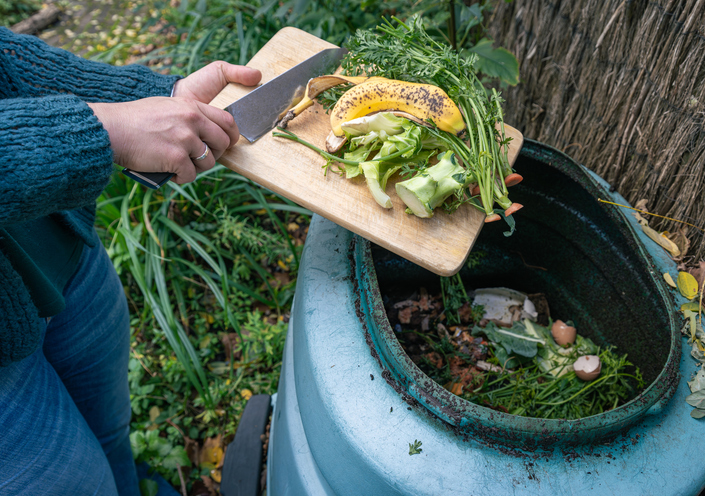
Two and a half years ago I started home composting as part of a more sustainable lifestyle. Every day, a lidded bowl finds its way onto one of my kitchen countertops. This bowl quickly fills up as the day progresses, with everything from eggshells and unbleached kitchen paper towels, and bits and pieces of fruit and vegetables that do not make it into our meals. It is a great feeling that I am not just throwing all of this in the bin.
How does composting work?
Composting is a recycling process of kitchen scraps, garden waste, and other organic matter that you can do at home. It is you mimicking nature’s way of breaking down organic matter with the help of bacteria, fungi, and other decomposing organisms. Much like what you can see happening on the forest floor. With composting, you reduce the flow of waste to landfill, reduce methane emissions, and improve the soil health of your garden. And you are making your own potting mix/ garden soil.
Composts need four inputs: 1. nitrogen, a.k.a. green materials, 2. carbon, a.k.a. brown materials, 3. water, and 4. oxygen. Green materials include fresh organic materials like fruit and vegetable scraps, grass clippings and freshly pruned garden waste. Brown materials include dead leaves, twigs, and brown paper or cardboard (make sure it is uncoated, I also avoid materials with lots of ink printed on them). You need to aim for 1/3 green, 2/3 brown matter to ensure your composting organisms thrive, adding them in alternating layers as best as you can. As a suburban composter, I never add animal manure to my compost. I know this would be beneficial, but my focus is on household waste reduction that is simple and not too time-consuming.
Aerate your compost at least once a week with an aerator stick or garden fork. I water my compost roughly every second week, this is a light watering. Drenching your compost will not help your composting organisms, they just need a humid environment. That is all there is to it. It is really this simple.
Should I get a Compost Bin or a Compost Tumbler as a Beginner?
When I decided to start composting at home, I tossed up between a compost tumbler and a compost bin. A compost tumbler seemed like such a clean and fun way to compost, and an attractive option if you are afraid to attract rats. But it seemed to require more careful management as there is no contact with the soil and its composting organisms. I wanted a system that I can leave alone for a few days every now and then, and one that can handle a good volume of waste. For a first-time composter, I decided that a compost bin was my best option.
I got the Green Johanna 330 litre composting bin from Maze Products, and I would happily recommend this sturdy system to anyone! The Green Johanna is super easy to assemble and comes with a base plate, so rodents cannot dig in under it. It also has two little doors at the bottom for you to remove fresh compost and comes with an aerator stick, so you have your complete kit in one purchase. The Green Johanna is capable of hot composting, but I use it as a cold composting system. Before we go any further, let’s quickly explore the difference.
Hot vs. Cold Composting
These are the two different approaches to breaking down organic material. Hot composting is a faster process that breaks down materials at high temperatures (54–71°C). It can produce compost in as little as 4 to 8 weeks. It requires a careful balance of nitrogen-rich greens and carbon-rich browns, and a very hands-on management of the temperature and frequent aerating. The heat it generates helps kill most weed seeds and pathogens, making it safe to add meat and dairy to the mix. Cold composting, on the other hand is a slower, low-maintenance method that decomposes organic waste at ambient temperatures. Finished compost typically takes 6 months to 2 years. The big benefit is that materials can be added gradually, an out-of-balance mix can be tweaked later, and you don’t need to be too strict with turning your pile. However, it doesn’t get hot enough to kill weed seeds or pathogens.
As a home composter, I open my compost bin and adding to it multiple days a week, meaning that my approach is incompatible with hot composting. I don’t the need to produce large volumes of compost to use for my garden and pot plants. So cold composting is the way to go for me and, in my opinion, for any beginner.
How To Get Started With Your Compost Bin
1. Pick A Good Spot For Your Compost Bin
Pick a spot on your grass or in your garden that receives partial sun and is easy to get to – you want this to be as convenient as possible! Do not put it on concrete or tiled areas, your bin will leak some liquid called leachate from the bottom. This liquid is nutrient-rich and good for your garden but will stain any area where it cannot drain freely. Try and place it close to a water source, also for convenience.
2. Get Your Base Layer Right
The Green Johanna comes with a very useful, clear manual. The base layer is key. Make a layer of coarse garden waste like sticks and twigs, followed by grass clippings or green garden waste, and a layer of soil. Now you can start composting.
3. Start Composting by Adding Your Green and Brown Materials
Now you are ready to start composting. Add your greens and your browns in alternating layers. Green materials are more likely to smell, so it is best to add brown materials on top. My home produces more green materials than brown materials. This is why I collect cardboard boxes or let clippings from my hedges dry out until they become brown. This is also the time to start monitoring the moisture levels of your compost and aerating it regularly.
4. Cure your compost
Now after many months (or maybe even a year), you will want to cure the compost you have accumulated. To know if you are ready for the curing stage, take a look at the contents of your bin. If you can no longer see food scraps or chunks of cardboard, you are ready. Stop adding more waste materials now. Curing is important for a few reasons:
- Fresh compost can damage the roots of young plants
- It gives the worms, beneficial fungi, and other creatures time to populate the compost and improve it
- Microorganisms can improve the nitrogen content of your compost before you apply it to the soil.
Don’t worry if you have been composting for a little while and chucked fresh compost straight into your garden. I have done that too. This step just helps you get the most out of your compost (and reduces your store-bought fertiliser bill).
For the best results, empty the contents of your bin onto a damp area of your garden and cover it with a tarpaulin. One of the luxuries of an open-based bin is that you have the option of leaving it right where it is. Keep monitoring the moisture but otherwise leave the compost to cure for four weeks at the very least. Some people suggest the minimum is six weeks. This timeframe is suits composts like mine, that were mostly fed plant scraps. If you added manure, you should cure it for longer to allow pathogens to disappear. In this case, cure it for at least 12 weeks. The compost is ready when it looks and smells like beautiful dark earth that you want to plant straight into.
Sounds easy, right?
And there you have it, that is how easy it is to use a compost bin. Composting can sound complicated and scientific depending on where you read about it, but it is easy in practice. It is a skill that almost everyone had until a few generations ago, and one that is hopefully making a comeback. So don’t be afraid to get started, you will see how much satisfaction it brings you!
Fabulous education on composting very helpful
Thank you, Donna!